I have had a couple of calls from people who are having problems following the directions to make up your quilt as you go blocks. The instructions are correct but the method is slightly different to a normal Quilt as you go method you may have done before so I thought a step by step photo tutorial may make it clearer to you especially if you are a visual learner…. this should clear up any confusion for you all…. have fun..
For one block you need one 10″ square of batting. It doesnt matter what type but keep to the same type for the whole quilt. A good way to use up all your scraps from previous quilt projects.

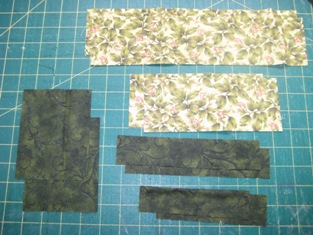
For one block you need
two rectangles of ColourA (dark green in photo) 3 7/8″ x 4 7/8″
two strips Colour A 1 1/2″ x 5 1/2″
two strips Colour A 1 1/2″ x 7 1/2″
two strips Colour B (floral in photo) 3″ x 7 1/2″
two strips colour B 3″ x 12 1/2″
Lay your finished stitchery block in the centre of a batting square. You can measure if you wish but just judging with your eye is okay – there are measures later to make up for imperfections.

Lay a 5 1/2″ Colour A strip right sides together on the top and bottom of the stitchery block.

using a 1/4″ foot stitch through all layers


because you are stitching through batting you may find it easier to use your walking foot.

press the strips open

lay the 7 1/2″ strips on the sides of your block, stitch again with 1/4″ seam
Press open to reveal the finished front side of a block
you need to now trim the block (batting) back to measure 9″ square. If you have a square ruler lay it on top and centre the stitchery block into a 9″ square
trim the excess off one side at a time

If perfectly accurate there should be 3/4″ of batting left on each side of the block. However, if you were not perfectly accurate this is where you can fix it.

your completed block front

now take your two rectangles and lay them both right side up.

place them on top of each other (still both right sides up) and cut with your rotary cutter and ruler diagonally from corner to corner


take one pair of your triangles and lay them right sides together on opposite sides of your back centre 5 1/2″ square (this would normally be your stitched verse but I have just used a feature fabric to save time stitching another square)
stitch using a 1/4″ seam (careful not to stretch the bias edges of the triangles) and press open.

now lay the remaining two triangles right sides together on the remaining two sides. See how the little triangle bits hang out at the ends, this is correct as they will be even when you press them out after stitching.

press open. you can trim off your little triangles and square the block if you are a ‘neat’ freak but you dont have to.

now take your front block you made on the batting and lay it right side down on your table. Take the back diagonal square block like the one in the pic above and place it right side up in the centre of your wadding. Get it as accurate as possible but again just your eye is good enough.
Lay a 7 1/2″ strip right sides together on both sides of this block.

attach the strip using your walking foot and a 1/4″ seam through all layers – yes it will stitch through the strip on the front. The stitch line should be a 1/4″ from the edge of your strips on the front or thereabouts..

press the strips open

on the back again – lay the 12 1/2″ strips across the top and bottom right sides together. Stitch and press open

This is how your block now looks from the back!
and this is how it looks from the front – note that the borders from the back are extending outside the edges of your batting square.

just as another reminder – place the diagonal square block (or verse block in your case) centrally on the back of the stitchery block and batting
attach the two shorter 3″ strips, press open


repeat with the longer 3″ strips
Now you have two finished blocks you can start to join them together. This is how they look from the back (remember you will have verses in the centres)
and this is how they look from the front

now the instructions say: lay two blocks with the back block fabric right sides together so flip them onto the front so the backs are showing again
now flip one over on top of the other so that the backs are right sides together
place a ruler under your presser foot and lower the needle carefully so it sits on the 1 1/2″ line.

lay a piece of tape – masking tape or plumbers tape along the edge of your ruler on the machine bed

again using your walking foot stitch the two blocks together with the edges of the fabric lined up with the edge of your tape marking.

the stitching line should fall alongside the batting squares.
the larger than normal seam allowances (about 1 1/4″) are showing on the front side of your blocks – yes the front!

press open these seams

fold under a small hem on one seam allowance (Picture shows the burgundy one on the left) until the folded edge meets the stitching line. It should be about a 1/4″ hem which will give you a 1″ strip which now forms the last border on your front block!
see the folded edge just covering the stitch line. Press well, pin if necessary.
now do the same on the other side of the seam allowance

I now used a wide zig zag stitch on my machine to stitch these seams down. Using a zig zag again gives you some leeway if your piecing has not been perfect. If you are a perfectionist or a traditionalist you can choose to hand slip stitch these edges down. If machine stitching begin and end the stitching line at the edge of the fabric on the front block – dont stitch right to edges of the back fabric. You could use an edge stitch if your piecing is super accurate or another fancy embroidery stitch on your machine for this step.

now imagine you have stitched two whole rows of these blocks together. you now need to join the rows in exactly the same way. And then when all the rows are together you will have 1 1/4″ seam allowances around all the edges. Bring them to the front in the same way with the little hem meeting the stitch line and your quilt is finished – both front and back and quilted!!! tada
I have just pinned the outer seam allowances in so you can see how it will look.
I hope this solves and confusion and makes it more obvious to you how it works. It really does work and is quite a nifty method for a quilt such as this when you want it to grow with you as you stitch. Have fun creating…!


Wow that’s very clever! Thanks for the great tutorial.
Thanks Helen from me too!
Am very pleased to see this tutorial – had a vague idea….
[…] I have put two pics here. One from the quilt and one I colourque’d which you may have noticed in the putting it together tutorial… […]
great have made quilt as you go before using a different method like your one better
Thanks Helen.
I’m looking forward to receiving my patterns, and your explanation was fabulous!
I have just read your tutorial and I am quite confident I could do this, thanks for the great explanations, Helen.
Thanks for the tute. This is the first I have seen without haveing to sew the strips by hand. It is great for someone (like myself) that has nerve problems so has problems hand sewing. Great tutorial, very easy to understand!!!
Oh my gosh, you just made that AMAZINGLY easy. Now i want to go start a quilt as you go project RIGHT NOW!!!
Claudia
thank you thank you thank you.
yah at last i feel i can get on with my quilt, i have been very apprehensive about starting to cut and put together, (y’know a little worried that i’d make a HUGE mistage) but now i feel more confident in making that first cut — here goes.
[…] People Nice Things, and just LOVED the stitcheries. I also love the way Helen has made it a “quilt as you go” quilt. Perfect for someone like me who is not happy with the quilting part of […]
Hello I love your idea, love the scripture verse and love that the back will be patch work and of course the quilt as you. My only problem is the quilt I’m doing makes up 12 inch blocks. Do you have measurements for that figured or I’ll be getting out my rulers… should have paid attention in algebra! Erin
Yes please I have all the blocks mande in 12 in squares and would like to know how to make it work for me. Unfortunately I am too old to remember algebra
Helen, I see the Block of the Month designation of the darling stichery blocks. I looked and can’t find a way to obtain the pattern. You invite to post picture of our blocks so I’m assuming you are providing the patterns to us. Sorry I can’t find them! I see the photo if I click on your blocks; do we do them from that?
Just a question… would it be possible to make the NPNT block using a jelly roll?
Thank you for a great tutorial! The last bit was different from what I have read before and makes me want to try this on the next suitable project.
How clever is THAT? I thought I knew what I was doing, but this is brilliant!
With this I might be able to do this!! Not done any before but looks like fun!!! Thanks I am a very visual person and I love the step by steps… Jude
Thanks – this is very clever!
WOW! This is a great tutorial. It made perfect sense. Thanks so much for sharing it.
Do you have a DVD on your Quilt As You Go? These instructons are just what I have been looking for.
no sorry Karen I dont, but it will always be here on the blog to refer to.. hugs Helen
Finally someone has come up with the word(s) that i was looking for. Visual learner. That is me. I’m pushing 70yo and visual is so much better for me. Thank you so much for this visual tutorial. Sure helps me.
Wonderful technique! You are a genius!
Thanks for sharing! and so handy :o)
I am very new at this and I wonder what is the size of your center stitchery block? Is it 5-1/2 x 7-1/2?
Great visual tutorial. Thank you.
[…] to the crown. First, I pieced the front by sewing the pieces together through the batting like this. Next I attached the “1″, sewing a narrow zig-zag with a short stitch […]
Oh I love those instructions. I’m totally going to try that! Thanks so much!
Hi, Just read your tutorial. Am trying to help a friend that has never quilted before make her son an organic quilt. can we just do squares sewn together. All same size, just different colors? thanks
hi Sharon, you can just make the blocks without the sttichery panel and it will work. regards Helen
Great tutorial – i’m a beginner, i thoroughly felt comfortable with your tutorial on using “Quilt as you go”. Would you mind suggesting references to quilting books or inspiration books that is easily understood like your tutorial. I’m open to using DVD’s.
Thank you Helen….. A great pattern and great instructions. We are so blessed that we are so passionate about what we do ….Thank you for being an inspiration to so many.
Looking forward to meeting you at Country Patchwork Cottage in WA….
Now I better keep stitching……
HUGS,
Denise 26 Jan 2010
hi Denise, I am really looking forward to coming to WA -the only state I have never worked or visited. So will be great to meet you, do bring your show n tell to show me your progress! Hugs Helen
I had instructions for this on a VHS tape but our VHS player is inoperable so thought I lost it. This is much better than following a tape. Thank you for sharing!
my pleasure Mary Jane, glad to be of assistance. Helen
This looks like it could be done with so many patterns, I have not been quilting because of the cost of getting a long arm or the time it takes to do the quilting by hand. Too many things in life I want to try to take the time it takes for the hand quilting or the space you need to set up the frame. My grandmother did that in the dinning room of her home. I remember there was always a quilt on that thing. She did do beautiful work though. Thank you for sharing!
hi Kat, yes it could be done with many patterns and there are also other Quilt as you go methods that would work for other patterns, just google and you will find many.
hugs Helen
A beginner> I would like to attach my front piece,sash(edge piece) together BUT have just one big solid backing piece, such as a sheet. could this be done with this way. seems easier than trying to manage the batting to.
Sure glad I found your site. hooray
earline
hi Earline, no you would need to cut your backing sheet up to the block size to use this method.hugs Helen
Thanks for the info, will do this one the conventional way but the next quilt I will do this way. Thanks for putting together such a great tutorial, I need to be spoon fed some time I guess this happen when you are learning things when you are older. 70+ Hugs earline
PS what I have done is make squares for a queen cover
all 2 inch squares with pics of my daughter growing up & g.g.g.grand parents pic on some of the 2 inch squares random. the 2 inch squares are made in to blocks of 10 X 10 sq.
good on you Earline, its never too late to learn, or to love stitching and quilting. your quilt sounds wonderful, but a lot of little squares! hugs, Helen
I too loved the tutorial. Everything else hand stitches on the back. I am sooooooooo happy to come across this type of Quilt as you go. Thank you
Helen, I just had a question for you , I just read through your tutorial, and I get how the first two squares are put together, but when you want to add morehow do you add them, I mean your 2 sashings ( the green and burgandy) or backings they come all the down to the edge, do you cut them off….. I’m not sure I understand this part… sorry but I just need a little more direction….
thanks so much for your help
Marilyn
HI Marilyn, no you dont cut them off! when you have put your rows together as in the tutorial then you join the rows together using the same method. so the bits at the top and bottom now become long sashings to put to gether the same way between each row rather than between each block. I am sure as you go making it it will make sense, regards HElen
Hi Helen,thanks a lot for this great tutorial.
I´m soo glad about finding your blog…
Tomorrow I will try and post photos.
Regards
I went to a class for a fun and done quilt starting with a five sided piece of fabric and I am so confused. do you have any directions explaining how to do one like that?
sorry Mary Beth I do not know of the fun and done method or class so cannot really help you there. Perhaps contact the teacher or the store where it was held for extra help. regards Helen
I made my quilted blocks and put them together as per your instructions. Do I sew to the top and bottom of each block and How do I add sashing to my long rows
so I can sew together and finish my quilt.
Do you have pictues samples of how to connect all the rows with one long sashing strip??
Now how to I put rows together…?
I would appreciate more how to finish a QAYG quilt.
Thanks
hi Peekaboo, this method doesnt use long sashing strips as in some qayg methods. All the instructiosn are in youir pattern sheet how to put the blocks and then the rows together, just follow them closely step by step and use this tutorial for photo assistance should you need it. hugs Helen
Helen, I too am glad to have Googled your very easy and detailed instructions. I have never done a quilt with this quilt as you go method, and was very hesitant to start. But not anymore, thankyou so much taking the time to do pictures also. I will be starting the assembly process on my embroidered blocks that have been sitting here for a few months tomorrow morning. This is only my 4th. quilt that I have made and am totally looking forward to getting started in the morning. Thankyou again
is there a way to print this tutorial for PUTTING IT ALL TOGETHER (quint as you go)???
not sure Donna, just try printing the web pages , you can drag and copy the sections you want and try selecting print selection in your print dialog – I have not prepared a print version sorry. regards Helen
I will be doing this QAYG method for sure .Thanks for thaking the time to do this for us quilters!!!
This is THE BEST quilt as you go tutorial I have EVER seen! Thank you SO MUCH! I have been a quilting lover since I was a small child and have made a few. Again… Thank you so much for your easy to understand directions 🙂
why thankyou Debbie, I am glad I could help 🙂
thanks for making what I have been told is “simple” into simple clear instructions/ I even bought a book to figure this out and it left me in the dark. Working on my first quilt for my grand daughter and frustratingly found out that I couldn’t get in to quilt more than about 12″ because I have a reg sewing machine
cheers
Eileen
Thanks for your lovely clear and easy to follow tutorial. What about if, as in my case you already have the blocks stitched and now want to attach them to the batting and backing in the quilt as you go method? How would you go about that, do you think?
Cheers,
Anita
if you have just done the hand stitching of the blocks then just assemble as per the tutorial. If you have already peiced them with borders etc you will need to just layer and quilt as normal now. good luck..